The Savage Wastes is the eleventh adventure in the Peaks of Time campaign. It is unlockable upon completion of stage 16-4 in the main Campaign and completing at least 66% of the previous adventure, The Dismal Descent.
Lore
Buried deep below the sands of this inhospitable wasteland lies the remnants of a civilization that once was great - a civilization that existed in an era where gods and mortals stood shoulder to shoulder. The hubris of mortal men brought about disaster that led to their own downfall. Mortal mages initiated a powerful arcane ritual that grew too strong from them to control, causing the city to be engulfed by desert sand. Now, all that remains of this once great civilization are its marvelous riches that lie somewhere beneath the desert's dusty surface.
Adventure Information
This Peak has a unique feature, in that after every battle, all heroes lose 40% of their maximum life and 40% of maximum energy. This includes heroes that didn't participate in the battle. Image below shows your backup heroes after 2 battles (Nemora was used in battles).
Template:Infobox Hero

To counter this, there are Watering Holes throughout the battlefield that restore all heroes' health and energy back to 100%, including any heroes that are currently dead.
Another unique feature of The Savage Wastes is that you won’t receive relics for victories. Instead, all relic chests are placed in different spots on the map. Therefore, you should first open the entire map in several tries and then just look into the chests before starting the first battle. If the relics are not good, restart the adventure.
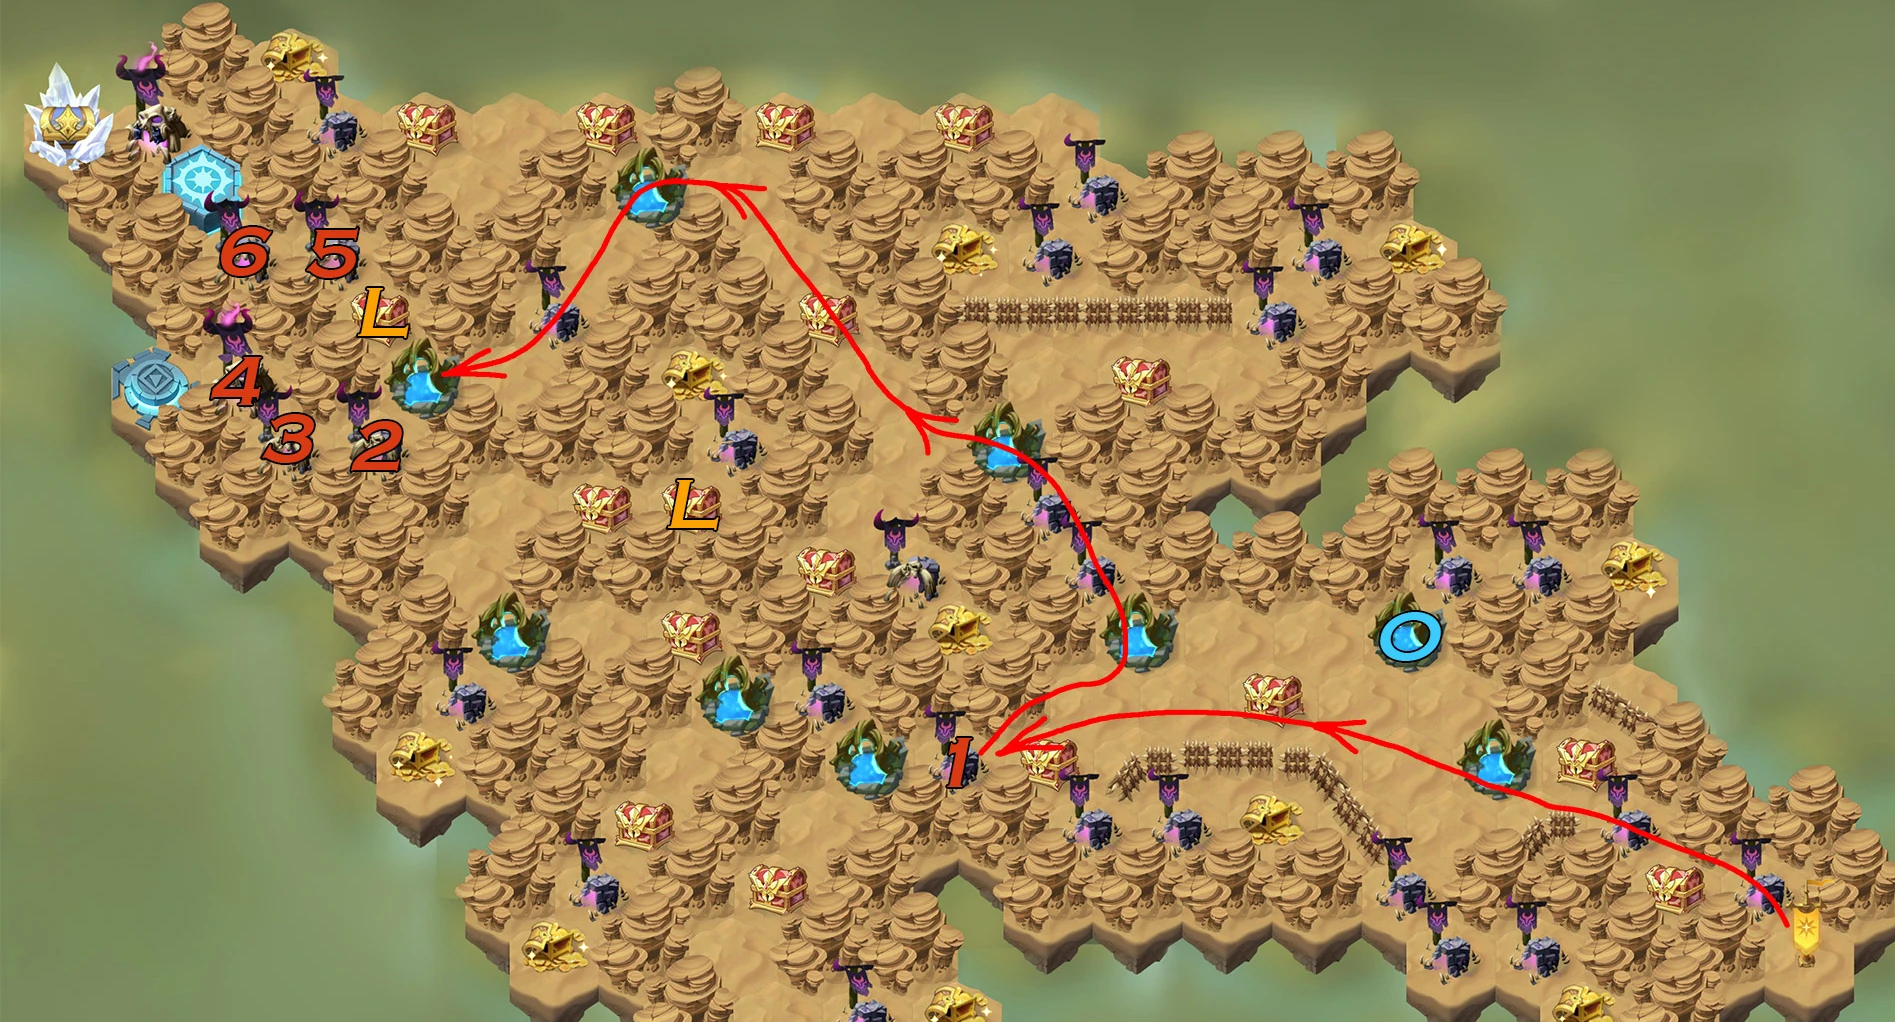
Adventure Map
Placement of all the Watering Holes and chests is shown on the map below. Legendary relic chests are marked with L. The map also shows how to obtain the main rewards chest. Collecting other rewards (dust and coins) is relatively easy.
Guide to obtain Dura's Chalice of Vitality
Go to enemy 1 and kill it. Do not use Watering Hole behind 1, you will need it later. Also, do not use Hole 0.
Make your way to enemy 2, while collecting the relics. Defeat 2 and 3, go back to heal at Hole 1.
Defeat the enemy to the west of Hole 1. Then defeat 4, go back to spot 1 and continue your way to the West. Use a Hole there and collect a Legendary relic.
Then clear 5 and 6 and use Hole 0.
You should now have full HP and mana before the final boss.
Useful Heroes in The Savage Wastes
- Shemira – can solo kill all the opponents which saves you an extra use of the Watering Hole.
- Lucius and Nemora – both keep your team’s HP at maximum, meaning more battles without Watering Holes.
- Brutus – Useful on the final boss as he can survive Athalia’s jump due to immortality skill.
Useful relics
- Spider thread gloves
- Deathly embrace
- Sunstone + Moonstone
- Firebringer + Icebringer
- Call to arms
- Branch from the Yggdrasil
Note: Horn of replenishment is not effective in this adventure because it replenishes only HP that is lost in battle, while the Savage Wastes debuff will remove HP after the battle.
Battles
Initial Area
| Tier | Relics | Required | Enemies | Image | Location |
|---|---|---|---|---|---|
| Common | N | Y | Fiend - Lv. 180 - A Fiend - Lv. 180 - A Bloodsnarl - Lv. 180 - A Bloodsnarl - Lv. 180 - A Bloodsnarl - Lv. 180 - A |
First compulsory battle | |
| Common | N | Y | Dreaf - Lv. 183 - A Dreaf - Lv. 183 - A Merek - Lv. 183 - A Eletha - Lv. 183 - A Eletha - Lv. 183 - A |
Second compulsory battle | |
| Common | N | N | Eletha - Lv. 186 - A Eletha - Lv. 186 - A Dreaf - Lv. 186 - A Dreaf - Lv. 186 - A Nemora - Lv. 186 - A |
North East path in initial area, first battle | |
| Common | N | N | Hogan - Lv. 195 - A Estrilda - Lv. 195 - A Morvus - Lv. 195 - A Angelo - Lv. 195 - A Mirael - Lv. 195 - A |
North East path in initial area, second battle | |
| Common | N | N | Silvina - Lv. 201 - A Kaz - Lv. 201 - A Niru - Lv. 201 - A Ferael - Lv. 201 - A Arden - Lv. 201 - A |
South East path in initial area, first battle | |
| Common | N | N | Fiend - Lv. 204 - A Golus - Lv. 204 - A Brutus - Lv. 204 - A Khasos - Lv. 204 - A Fiend - Lv. 204 - A |
South East path in initial area, second battle | |
| Common | N | N | Hogan - Lv. 195 - A Estrilda - Lv. 195 - A Morvus - Lv. 195 - A Angelo - Lv. 195 - A Mirael - Lv. 195 - A |
South East path in initial area, third battle | |
| Common | N | N | Morvus - Lv. 189 - A Morvus - Lv. 189 - A Morvus - Lv. 189 - A Merek - Lv. 189 - A Niru - Lv. 189 - A |
Fenced section in initial area, first battle | |
| Common | N | N | Warek - Lv. 198 - A Khasos - Lv. 198 - A Vurk - Lv. 198 - A Saveas - Lv. 198 - A Vurk - Lv. 198 - A |
Fenced section in initial area, second battle |